This is the first post on my new blog. I’m just getting this new blog going. As the blog name reflect, I have created this for sharing knowledge, experience and skills about maths and technology, so stay tuned for more. Subscribe below to get notified when I post new updates.
छूना है आसमां
जाना है मुझे बादलों से पार छूना है मुझे आसमान खोजनी है एक राह नई तरीका नया तकनीक नई तोड़ना नहीं है बंधन कोई पर उड़ते रहना है लगातार
This is an example post, originally published as part of Blogging University. Enroll in one of our ten programs, and start your blog right.
You’re going to publish a post today. Don’t worry about how your blog looks. Don’t worry if you haven’t given it a name yet, or you’re feeling overwhelmed. Just click the “New Post” button, and tell us why you’re here.
Why do this?
Because it gives new readers context. What are you about? Why should they read your blog?
Because it will help you focus you own ideas about your blog and what you’d like to do with it.
The post can be short or long, a personal intro to your life or a bloggy mission statement, a manifesto for the future or a simple outline of your the types of things you hope to publish.
To help you get started, here are a few questions:
Why are you blogging publicly, rather than keeping a personal journal?
What topics do you think you’ll write about?
Who would you love to connect with via your blog?
If you blog successfully throughout the next year, what would you hope to have accomplished?
You’re not locked into any of this; one of the wonderful things about blogs is how they constantly evolve as we learn, grow, and interact with one another — but it’s good to know where and why you started, and articulating your goals may just give you a few other post ideas.
Can’t think how to get started? Just write the first thing that pops into your head. Anne Lamott, author of a book on writing we love, says that you need to give yourself permission to write a “crappy first draft”. Anne makes a great point — just start writing, and worry about editing it later.
When you’re ready to publish, give your post three to five tags that describe your blog’s focus — writing, photography, fiction, parenting, food, cars, movies, sports, whatever. These tags will help others who care about your topics find you in the Reader. Make sure one of the tags is “zerotohero,” so other new bloggers can find you, too.
Decimal place value is a number place of decimal digit in any number. Now we need to know what is “Decimal”. In number place value we determine whole number’s place that means only digits 0-9 can be used in number place, but what if there is some value between whole numbers 1 and 2, then here comes “Decimal place value” concept because decimal place value works on the parts of numbers. The parts are also called “Fraction” . For example, If I have 4 apples then I can use Number place value for counting them, but if I have 3 parts of one apple then I will use Decimal place value.
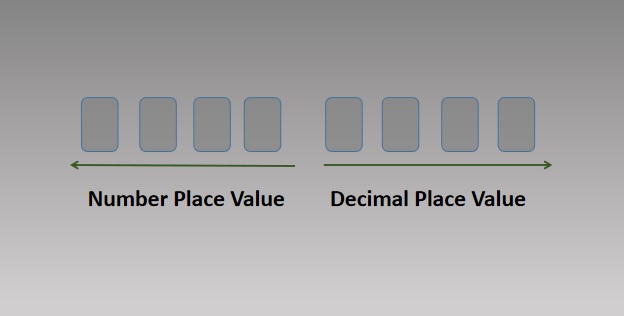
How I can count parts using Decimal place value? Just like in Number place value, the number are counted from right to left, in Decimal place value numbers are counted from left to right. But there is one question arise that how can I differentiate that what is number place value and what is decimal place value just like below image:
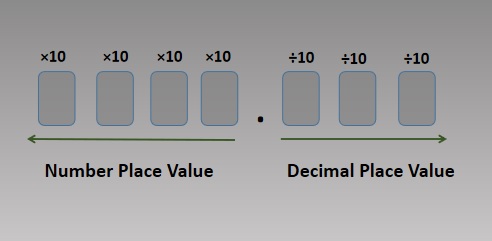
To differentiate between Number place value and Decimal place value we use a separator (.), which is called Decimal point and it locates between number place and decimal place values. So the left hand side numbers of decimal points are number place value and the right hand side numbers of decimal points are decimal place value. Also in number place value when we move towards right to left the values of digits are 10 times bigger than its right side digit and similarly when we move towards left to right the values of digits are 10 times lesser than its left hand side digit, just as below image:
To understand decimal place let take one example that suppose we have 1 Pizza and if we divide that pizza in 10 parts and we take 4 pieces of pizza then those 4 pieces are called 4-10th parts of that pizza because we divided pizza in 10 parts. We will represent it by 4/10 fraction.
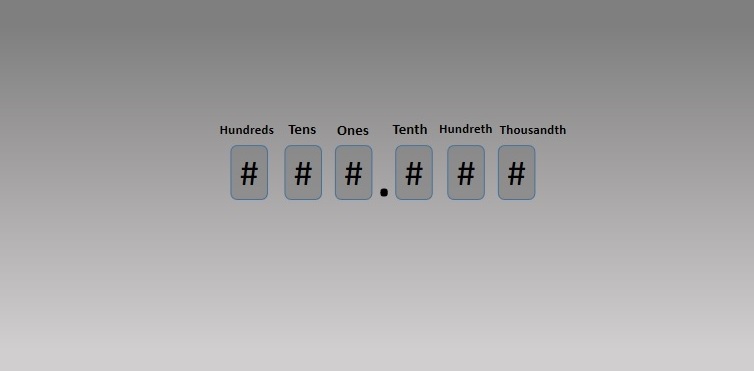
For example in number 347.8, .8 is 8-10th parts of that number so we will call this place “Tenth” place of this number. For example in number 593.21, “1” is 1-100th part of that number so we will call this place “Hundredth” place.
Below image shows the structure of Decimal place value:
This blog is a detailed explanation of “Number place value” in Base 10 system. Our mathematics is based on Number place values of any number. In mathematics number system is called Base 10 system because we use 10 symbols to represent Base 10 system that are 0, 1, 2, 3, 4, 5, 6, 7, 8, 9. These digits are called “Digits“. And we can make different numbers from 0 to one million, one billion and up to infinity with the help of the combination of these 10 digits
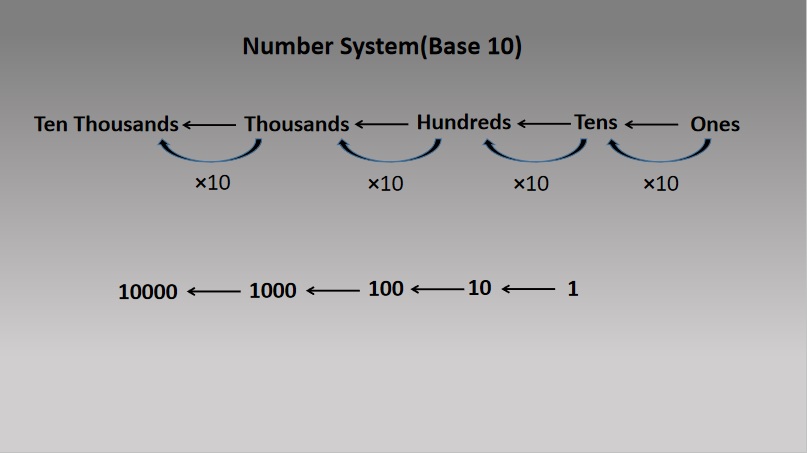
The number place value is the place which is given to every digit in that particular number. In number place the values are Ones, Tens, Hundreds, Thousands, Ten Thousands and more. Ones means single items, Tens means group of 10s, Hundreds means groups of 100s, Thousands means groups of 1000s and so on. As you go from right to left the value of place value is increased. Every left place value is 10 times bigger than its right place value, for example Tens place is 10 times bigger than Ones place and Hundreds place is 10 times bigger than Tens place.
In below image there is a number system(Base 10) structure which shows that every left side place value is 10 times bigger than its right side value.
Here are some examples of number place value:
368 – here 8 is in Ones place, 6 is in Tens place and 3 is in Hundreds place and the expanded form of 368 is — 300 + 60 + 8.
82 – here 2 is in Ones place and 8 is in Tens place and the expanded form of 82 is — 80 + 2.
4853 – here 3 is in Ones place, 5 is in Tens place, 8 is in Hundreds place and 4 is in Thousands place and the expanded form of 4853 is — 4000 + 800 + 50 + 3.
In above examples if you see there is digit 8 in every example but every time digit 8 is in different number place and according to number place the value of 8 is changing in every example.
To bring footage that is not already in the form of a file or set of files into a Premiere Pro project, you can capture it, or digitize it, depending on the type of source material:
Capture
You capture digital video from a live camera or from tape: you record it from the source to the hard disk. Many digital camcorders and decks record video to tape. You capture the video from tape to the hard disk before using it in a project. Premiere Pro captures video through a digital port, such as a FireWire or SDI port installed on the computer. Premiere Pro saves captured footage to disk as files, and imports the files into projects as clips. You can use Adobe After Effects to start Premiere Pro and start the capture process. Alternatively, you can use Adobe OnLocation to capture video.
Digitize
You digitize analog video from a live analog camera source or from an analog tape device. You digitize the analog video, convert it to digital form, so your computer can store and process it. The capture command digitizes video when a digitizing card or device is installed in the computer. Premiere Pro saves digitized footage to disk as files, and imports the files into projects as clips.
Note:
While capturing footage, you can monitor audio levels in the Audio Master Meters panel.
System requirements for capturing
To capture digital video footage, your editing system needs the following components:
For DV or HDV footage, one of the following:
an OHCI-compliant IEEE 1394 (FireWire, i.Link) port or capture card
a non-OHCI-compliant IEEE 1394 capture card with presets, drivers, and plug-ins written specifically for Premiere Pro.
For HD or SD footage playable on a device with SDI or component outputs, a supported HD or SD capture card with SDI or component inputs.
For HD or SD footage stored on media from file-based camcorders, a device connected to your computer capable of reading the respective media.
For recording audio from analog sources, a supported audio card with an analog audio input.
A codec (compressor/decompressor) for the type of footage you want to capture. Premiere Pro has its own codecs for importing DV and HDV footage. Plug-in software codecs are available for other types. Hardware codecs are built in to some capture cards.
A hard disk capable of sustaining the data rate for the type of footage you want to capture.
Sufficient disk space for the captured footage.
Note:
Your operating system or hard disk format could limit the length of a captured clip.
A project that was created using a preset in the New Project dialog box in which all settings match the footage you plan to capture.
Note:
Some DV and HDV camcorders require a connection to their power adapters to activate their IEEE 1394 ports. Other camcorders go into sleep mode or demo mode if left in the camera mode without tape activity for a period. To avoid these problems, connect your camcorder to its power adapter when setting it up for capturing or dubbing video. If the camcorder goes into demo mode with the power adapter connected, disable this feature using the camcorder menu system.
Set capture format, preferences, and tracks
Use the Capture panel (choose File > Capture) to capture digital or analog video and audio. This panel includes a preview, which displays video being captured, and controls for recording with or without device control. The Capture panel also contains a Settings pane for editing your capture settings, and a Logging pane for logging clips for batch capturing. For convenience, some options available in the Capture panel are also available in the Capture panel menu.
You can control certain source devices, such as camcorders and decks, directly from the Capture panel. Your computer must have an IEEE1394, RS-232, or RS-422 controller compatible with Premiere Pro. If your source device lacks any of these interfaces, you still use the Capture panel. You must cue, start, and stop your source device using its controls.
Note:
When not capturing in Adobe Premiere Pro, close the Capture panel. The Capture panel assumes primary focus, so leaving it open while editing or previewing video disables output to the source device. Leaving the Capture panel open also may decrease performance.
Capture panel A. Status area B. Preview C. Tabs D. Transport controls
Specify capture settings
With a project open, choose File > Capture, and select the Settings tab.
In the Capture Settings pane, click Edit.
In the Capture Settings dialog box, select an option from the Capture Format menu.
Click OK.Note:When capturing DV formats, Premiere Pro uses QuickTime as the container for the DV codec in Mac OS and AVI is used for Windows. When capturing HDV, Premiere Pro will use MPEG as the format. For other formats, you must use a video capture card for digitizing or capturing. See Digitizing analog video and Capturing HD video.
Set capture preferences
Choose Edit > Preferences > Capture (Windows) or Premiere Pro > Preferences > Capture (Mac OS).
Specify whether you want to cancel capture on dropped frames, report dropped frames, or generate a batch log file.
Specify whether to use device control timecode. If a device controller is installed, Premiere Pro can record the timecode supplied by the controller instead of recording any timecode written to the source tape.
Select tracks for capture
To open the Capture panel, select File > Capture.
In the Capture panel, click the panel menu.
Select Record Video, Record Audio, or Record Audio and Video, depending on the option desired.
Capture from stereo sources to mono tracks
You can capture from sources containing stereo or 5.1 audio channels so that each audio channel maps to its own mono audio track automatically. The Mono Default Track Format preference enables this behavior for footage captured from multi-channel sources, and for imported multi-channel files. For more information about audio channel mapping, see Mapping source and output audio channels.
Select Edit > Preferences > Audio (Windows), or Premiere Pro > Preferences > Audio (Mac OS).
In the Source Channel Mapping pane of the Preferences dialog box, select Mono from the Default Track Format menu.
Click OK.
File size limits
Premiere Pro does not limit the size of files. However, your capture card, operating system, or hard disk can set such a limit. Check your capture card and hard disk documentation for information on support of large files.
The format of your hard disk greatly affects its ability to handle large files. FAT32 formatting limits each file to 4 GB, or about 18 minutes of DV footage. NTFS formatting does not limit file size. It is best to use NTFS-formatted disks as the scratch disks where you capture video and for the target hard drives where you export video files. However, other components of your video editing system can limit file size.
Set up device control
You can use device control to manage and automate video capture and to export sequences to tape. Device control lets you precisely control devices, such as decks and camcorders, with capture and batch capture controls. With device control, you can use the Capture panel to log each clip and then use the Batch Capture command to record logged clips automatically.
Premiere Pro controls devices through its built-in support of IEEE 1394 (FireWire, i.Link) and third-party support for RS-232 and RS-422 controllers. Regardless of type, if your device isn’t automatically recognized, you can set it up manually. Before setting up device control, make sure that you have a tape deck or camcorder that supports external device control, and a cable that connects the device to your controller, computer, or both.
Set up a project for device control
Some device control settings are available when you choose Edit > Preferences > Device Control (Windows) or Premiere Pro > Preferences > Device Control (Mac OS). Others are in the Device Control section at the bottom of the Settings pane of the Capture panel. Device control settings apply to the entire project.
Choose Edit > Preferences > Capture (Windows) or Premiere Pro > Preferences > Capture (Mac OS).
Select one or more of the Capture options. If you are using a device controller that generates its own timecode, select Use Device Control Timecode. Use Device Control Timecode replaces the unreadable timecode recorded on the tape with the controller’s timecode. Click OK.
If you want to save captured clips to a specific bin in a project, first open the project. Before capturing, make sure that the bin exists in the Project panel.
Choose File > Capture.
In the Settings panel, click Edit to verify that the capture format specified in the Capture Settings dialog box is appropriate for your device. Click OK.Note:Not all formats have options for capture settings. For example, the HDV format has no options.
In the Capture Locations section of the Settings panel, make sure that the disk drives you designate for captured video and audio have sufficient free space. If you want to change the locations, click the corresponding Browse button, set the location, and click OK.
In the Device Control section, if device control has not been set up, choose a device from the Device menu. Click Options to set it up. Options vary depending on the device; see the documentation for your device driver.
Test the device control buttons in the Capture panel to verify that they work. If video preview is supported for the format, make sure that you see video in the preview.
Click Logging. In the Setup area, choose Audio, Video, or Audio And Video from the Capture menu depending on what you want to capture. Select a bin from the Log Clips To list if needed. By default, the Project panel is selected in the Log Clips To field.
Enter information into the Clip Data area as needed. This information is saved in the metadata of the clip.Note:To avoid confusion, make sure that the tape name is unique. Some types of device control software ask you to specify the Tape Name setting each time you insert a new tape. The other Logging Data options aren’t required.
Set up a device for device control
Premiere Pro supports the control of devices such as camcorders and VTRs. Premiere Pro controls DV and HDV devices by way of IEEE 1394 (FireWire, i.Link) connections. Premiere Pro controls serially controlled devices by way of third-party RS-232 or RS-422 controllers installed on the computer.
To open the Device Control Preferences dialog box, choose Edit > Preferences > Device Control (Windows) or Premiere Pro > Preferences > Device Control (Mac OS).
Select the type of device you want to control from the Devices menu.
Click Options.
(Optional) If you are connecting a DV or HDV device, make your selections from the Video Standard, Device Brand, Device Type, and Timecode Format menus. In the Device Type menu, if your particular model is not listed, do one of the following:
Select a model from the same family (if known).
Leave at Standard.
Click Go Online For Device Info.
If you are connecting a serial device, make your selections from the Protocol, Port, Time Source, and Time Base menus. Check either or both check box selections available for the Protocol you choose.
(DV/HDV Device Control only) Click Check Status. Premiere Pro displays one of the following statuses:OfflinePremiere Pro does not see your device. Check all your connections and settings.DetectedPremiere Pro sees your device but cannot control the tape (possibly because there is no tape inserted).OnlinePremiere Pro sees your device and can control the tape.
Click OK.
In the Device Control section of the Settings pane, specify the following options as needed:Preroll TimeIndicates how much before the In point Premiere Pro starts playing the tape before capture. The appropriate value varies depending on the device you are using.Timecode OffsetIndicates the number of frames to adjust the timecode embedded in the captured video. Set the offset so that the timecode corresponds with the timecode number of the same frame on the source tape.
Select a device for device control
In the Capture panel, select the Settings tab.
From the Device menu, select the type of device you want to control .
Click Options.
(Optional) If you’re connecting a DV or HDV device, make your selections from the Video Standard, Device Brand, Device Type, and Timecode Format menus. In the Device Type menu, if your particular model is not listed, do one of the following:
Select a model from the same family (if known).
Leave at Standard.
Click Go Online For Device Info.
If you’re connecting a serial device, make your selections from the Protocol, Port, Time Source, and Time Base menus. Check either or both check box selections available for the Protocol you choose.
(DV/HDV Device Control only) Click Check Status. Premiere Pro displays one of the following statuses:OfflinePremiere Pro does not see your device. Check all your connections and settings.DetectedPremiere Pro sees your device but cannot control the tape (possibly because there is no tape inserted).OnlinePremiere Pro sees your device and can control the tape.
Click OK.
In the Device Control section of the Settings tab, specify the following options as needed:Preroll TimeIndicates how much before the In point Premiere Pro starts playing the tape before capture. The appropriate value varies depending on the device you are using.Timecode OffsetIndicates the number of frames to adjust the timecode embedded in the captured video. Set the offset so that the timecode corresponds with the timecode number of the same frame on the source tape.
Calibrate an RS‑422 or RS‑232 device (third-party only)
Select File > Export > Export To Tape.
Click Options.
Enter the number of offset frames, as appropriate for your device, to the Delay Movie Start, Manual Edit Timing, and Preroll boxes.
Control an RS‑422 or RS‑232 device (third-party only)
Select Edit > Preferences > Device Control.
From the Devices menu, select Serial Device Control.
Click Options.
In the VTR And Port Control section, select a protocol and port for your device.
In the Time Control section, select a time source and timebase for your device.
Device controls in the Capture panel
You can use the controls in the Capture panel to operate the device as you log clips. The jog control lets you navigate quickly to nearby frames. The shuttle control lets you change the speed of the tape as you play it forward or backward. The Record button lets you begin a manual capture.
If you press the Rewind button when the tape is stopped, the device rewinds the tape at full speed. If you rewind when the tape is playing or paused, the device rewinds while displaying video in the preview.
If you press the Fast Forward button when the tape is stopped, the device moves the tape forward at full speed. If you fast forward when the tape is playing or paused, the device moves the tape forward while displaying video in the preview.
If you press the Previous Scene button, the tape shuttles to the previous start point and pauses. If you press the Next Scene button, the tape shuttles to the start point of the next scene and pauses.
Note:
Previous Scene and Next Scene are supported for DV in Windows only, and not supported for HDV for either Windows or Mac OS.
You can also press the J, K, and L keys to control your device. J rewinds the tape; L fast forwards it, and K pauses it. The speed of forward or reverse increases each time you press J or L. To rewind or forward one frame at a time, hold down K and press J or L once. To slowly rewind or forward, hold down K+J or K+L.
Note:
To operate Capture panel controls using the keyboard, see the tool tips in the Capture panel. You can change the shortcuts by choosing Edit > Keyboard Customization. To shuttle a tape quickly to a specific frame type its timecode into the Capture Panel’s current timecode field, to the lower left of the monitor. Press Enter (Windows) or Return (Mac OS).
Disable device control
Open the Device Control Preferences dialog box by doing one of the following:
Choose Edit > Preferences > Device Control (Windows) or Premiere Pro > Preferences > Device Control (Mac OS).
In the Capture panel, click Settings.
From the Devices menu, choose None.
Click OK.
Note:
When device control is disabled, start playback on the device manually.
Capture without device control
If you do not have a device that Premiere Pro controls, you can capture video manually. You manually operate both the playback device controls and the Capture panel controls in Premiere Pro.
Note:
Preview HDV footage on an external TV monitor, or, if the source is a camcorder, on the camcorder viewfinder while shuttling, logging, and capturing on Mac OS. The preview pane in the Capture panel shows the words Previewing On Camera.
Make sure that the deck or camcorder is properly connected to your computer.
Choose File > Capture.
(Mac OS) If a QuickTime Capture Settings dialog box opens, choose video and audio settings appropriate to your project.These settings are preserved for the project, but you can set them again for each new project.
In the Setup area of the Logging pane, choose your media type from the Capture menu.
Use the controls on the deck or camcorder to move the videotape to a point several seconds before the frame where you want to begin capturing.
Press the Play button on the deck or camcorder, and then click the red Record button in the Capture panel.
Record a few seconds beyond the end of the footage you need, to provide room for editing. Press the Esc key to stop recording.When the Save Captured File dialog box appears, enter logging data and click OK. The new file is listed in the Project panel and is saved to the disk location specified in the Settings pane of the Capture panel.
Capture with device control
After a device and the project are set up properly, you can begin capturing clips using device control. You can capture an entire tape or you can mark In and Out points for each clip, and then capture the clip. You can log In and Out points for any number of clips and have Premiere Pro capture as many as you like in a batch. Premiere Pro supports FireWire device control, but supports serial device control by third-party drivers only.
Note:
On Mac OS, preview HDV footage on an external TV monitor, or, if the source is a camcorder, on the camcorder viewfinder while shuttling, logging, and capturing. The preview pane in the Capture panel shows the words Previewing On Camera.
Note:
When capturing with In and Out points, the earliest allowable time for the In point is 2 seconds. If the provided In point is earlier, it will be automatically adjusted to start at 2 seconds.
For details about capturing tape from an AJA device and setup in Premiere Pro, see this video by Walter Biscardi.
Capture an entire tape or portion of a tape
Choose File > Capture.
(Mac OS) If a QuickTime Capture Settings dialog box opens, choose video and audio settings appropriate to your project.These settings are preserved for the project, but you set them again for each new project.
In the Capture panel, make sure that the device is online, as indicated above the preview.
Insert a tape into the device. Premiere Pro prompts you to name the tape. Be sure not to give any two tapes the same name.Note:Including a unique number in the name can help you avoid using the same name twice.
In the Setup area of the Logging pane, choose the media type from the Capture menu.
Rewind the tape to its beginning, or to the beginning of the portion you want to capture.
To create a separate file (Windows) or a subclip (Mac OS) for each new scene on the tape, select Scene Detect in the Capture area.
You can capture frames that extend beyond the In and Out points of each clip. Enter the number of frames in the Handles box in the Capture area.
Click Tape.
To stop capturing at the end of a portion, click the Stop button. Otherwise capturing stops when the tape comes to its end.
Select and capture a clip
Choose File > Capture.
(Mac OS) If a QuickTime Capture Settings dialog box opens, choose video and audio settings appropriate to your project.These settings will be preserved for the project, but you may need to set them again for each new project.
In the Capture panel, make sure that the device is online, as indicated above the preview.
Insert a tape into the device. Premiere Pro prompts you to name the tape. Be sure not to give any two tapes the same name.
In the Setup area of the Logging pane, choose the media type from the Capture menu.
Use the controls in the Capture panel to move to the first frame you want to capture, and click Set In. Then move to the last frame you want to capture, and click Set Out.Note:If capturing HDV footage on Mac OS, you must preview on an external TV monitor or camcorder viewfinder while logging. The preview pane in the Capture panel will show the words Previewing On Camera.
If you want to capture frames that extend beyond the In and Out points of each clip, enter the number of frames in the Handles setting of the Capture section.
Click the In/Out button in the Capture area of the Logging pane to capture the clip.
Determine whether your device is online
Select File > Capture.
(Mac OS) If a QuickTime Capture Settings dialog box opens, choose video and audio settings appropriate to your project.These settings will be preserved for the project, but you may need to set them again for each new project.
Select the Settings tab in the Capture panel.
In the Device Control area of the Settings tab, click Options.
In the DV/HDV Device Control Settings dialog box, click Check Status.
Log clips with automatic scene detection
Scene Detect can greatly speed up the process of logging clips. As you capture video, Scene Detect logs a clip wherever there is a break in a tape Time/Date stamp. With Scene Detect, Premiere Pro automatically captures a separate file (Windows) or creates a master clip with a subclip (Mac OS) at each scene break. On Mac OS, Premiere Pro places the subclips in a new bin. Scene Detect works whether you capture an entire tape or just a section between specific In and Out points. Scene Detect creates clips even between defined In and Out points, if it detects a scene break.
Scene Detect logs scenes for batch capturing without altering the tape’s progress. It also logs scenes that occur across timecode breaks.
Tracy Peterson provides a video tutorial that demonstrates automatic scene detection on the Adobe website.
In the Capture panel, do either of the following:
Click the Scene Detect button below the image.
Select Scene Detect in the Capture area of the Logging pane.
Scene Detect starts a separate file (Windows) or subclip (Mac OS) at the first frame of each scene Note:Scene detection works for DV, HDV 1080i, and HDV 720p footage.
Common capture issues
If you run into problems while capturing digital footage, refer to Premiere Pro Help or the documentation for your camera, deck, or capture card. For more information, check Troubleshoot digital video capture and playback. The following are common issues that may arise when you capture digital video:
If your device (camera or deck) goes into sleep mode, close and then reopen the Capture panel; or close the Capture panel, turn the device off and back on, and then reopen the Capture panel. You can disable sleep mode on many cameras by connecting them to AC power and ejecting the tape.
If video looks grainy in the Capture panel or Monitor panel, Premiere Pro may have decreased display quality to preserve capture quality. Video is captured and stored at the quality you determine and always plays at that quality on an NTSC or PAL monitor. On slower systems, Premiere Pro may lower the quality of the capture preview in order to ensure that sufficient CPU resources are available for full-quality capture.
If the video image does not appear in the Capture panel, verify your device control and capture settings. Then, leaving the device on, restart Premiere Pro.
If captured audio and video are not in sync, make sure that sections of tape weren’t skipped (left unrecorded) between shots. Blank tape areas lack timecode, which may cause interruptions in the camera time mode. When you capture the blank area, the camera doesn’t transmit valid frames, but time continues to be marked.
If no audio is recording, try playing a source through the computer’s sound input and speaker system without recording. If you can’t hear it, the audio source may not be connected properly or audio parameters may not be set properly. Check hardware connections, Sounds And Audio Devices in the Windows Control Panel, and mixer settings, and refer to the documentation for your sound card. In Premiere Pro, select Edit > Preferences (Windows) or Premiere Pro > Preferences (Mac OS), and check the settings for Audio, Audio Hardware, and Audio Output Mapping.
When shuttling, logging, and capturing HDV footage on Mac OS, the preview pane in the Capture panel will remain blank. You must preview this footage on an external TV monitor or, when the source device is a camcorder, on its viewfinder.
मुस्कान में क्या है? आत्महत्या के बारे में सोचने वाले व्यक्ति के लिए, यह जीवन का पहला कदम हो सकता है।#आत्महत्यारोकथामदिवस 10 सितंबर है। चारों ओर देखें और क़दम बढ़ाएँ। pic.twitter.com/pNBu8PGC94
— International Association for Suicide Prevention (@IASPinfo) September 4, 2020